Web UI
GNO's local web workspace for search, browse tree navigation, graph exploration, safe editing, and AI answers.
Web UI
A local knowledge workspace for visual search, cross-collection browsing, graph exploration, safe editing, and AI-powered answers.
gno serve
# Open http://localhost:3000
Overview
The GNO Web UI provides a complete graphical interface to your local knowledge index. Create, edit, search, and manage your documents, all running on your machine with no cloud dependencies.
| Page | Purpose |
|---|---|
| Dashboard | First-run onboarding, health center, stats, and quick capture |
| Search | BM25/vector/hybrid + advanced retrieval controls and tag facets |
| Browse | Cross-collection tree workspace with folder detail panes |
| Doc View | View document with edit/delete actions and tag editing |
| Editor | Split-view markdown editor with live preview |
| Collections | Add, remove, and re-index collections |
| Connectors | Install and verify core agent integrations |
| Ask | AI-powered Q&A with citations |
| Graph | Interactive knowledge graph visualization |
App-Level Tabs
GNO now keeps an app-level tab strip inside the workspace itself.
Current behavior:
- multiple app tabs can stay open at once
- each tab remembers its current route
- the last workspace tab set is restored after reload
- tabs live in GNO app state, not native shell BrowserView tabs
This is the foundation for the later multi-document and split-pane workspace.
Quick Start
1. Start the Server
gno serve                    # Default port 3000
gno serve --port 8080        # Custom port
gno serve --index research   # Use named index
If you want live indexing without a browser session, use gno daemon instead.
2. Open Your Browser
Navigate to http://localhost:3000. The dashboard now handles both first-run setup and ongoing health:
- First-run checklist: Add folders, review preset, and finish the first sync
- Health Center: Real status for folders, indexing, models, and disk
- Document count: Total indexed documents
- Chunk count: Text segments for search
- Quick Capture: Create new notes instantly
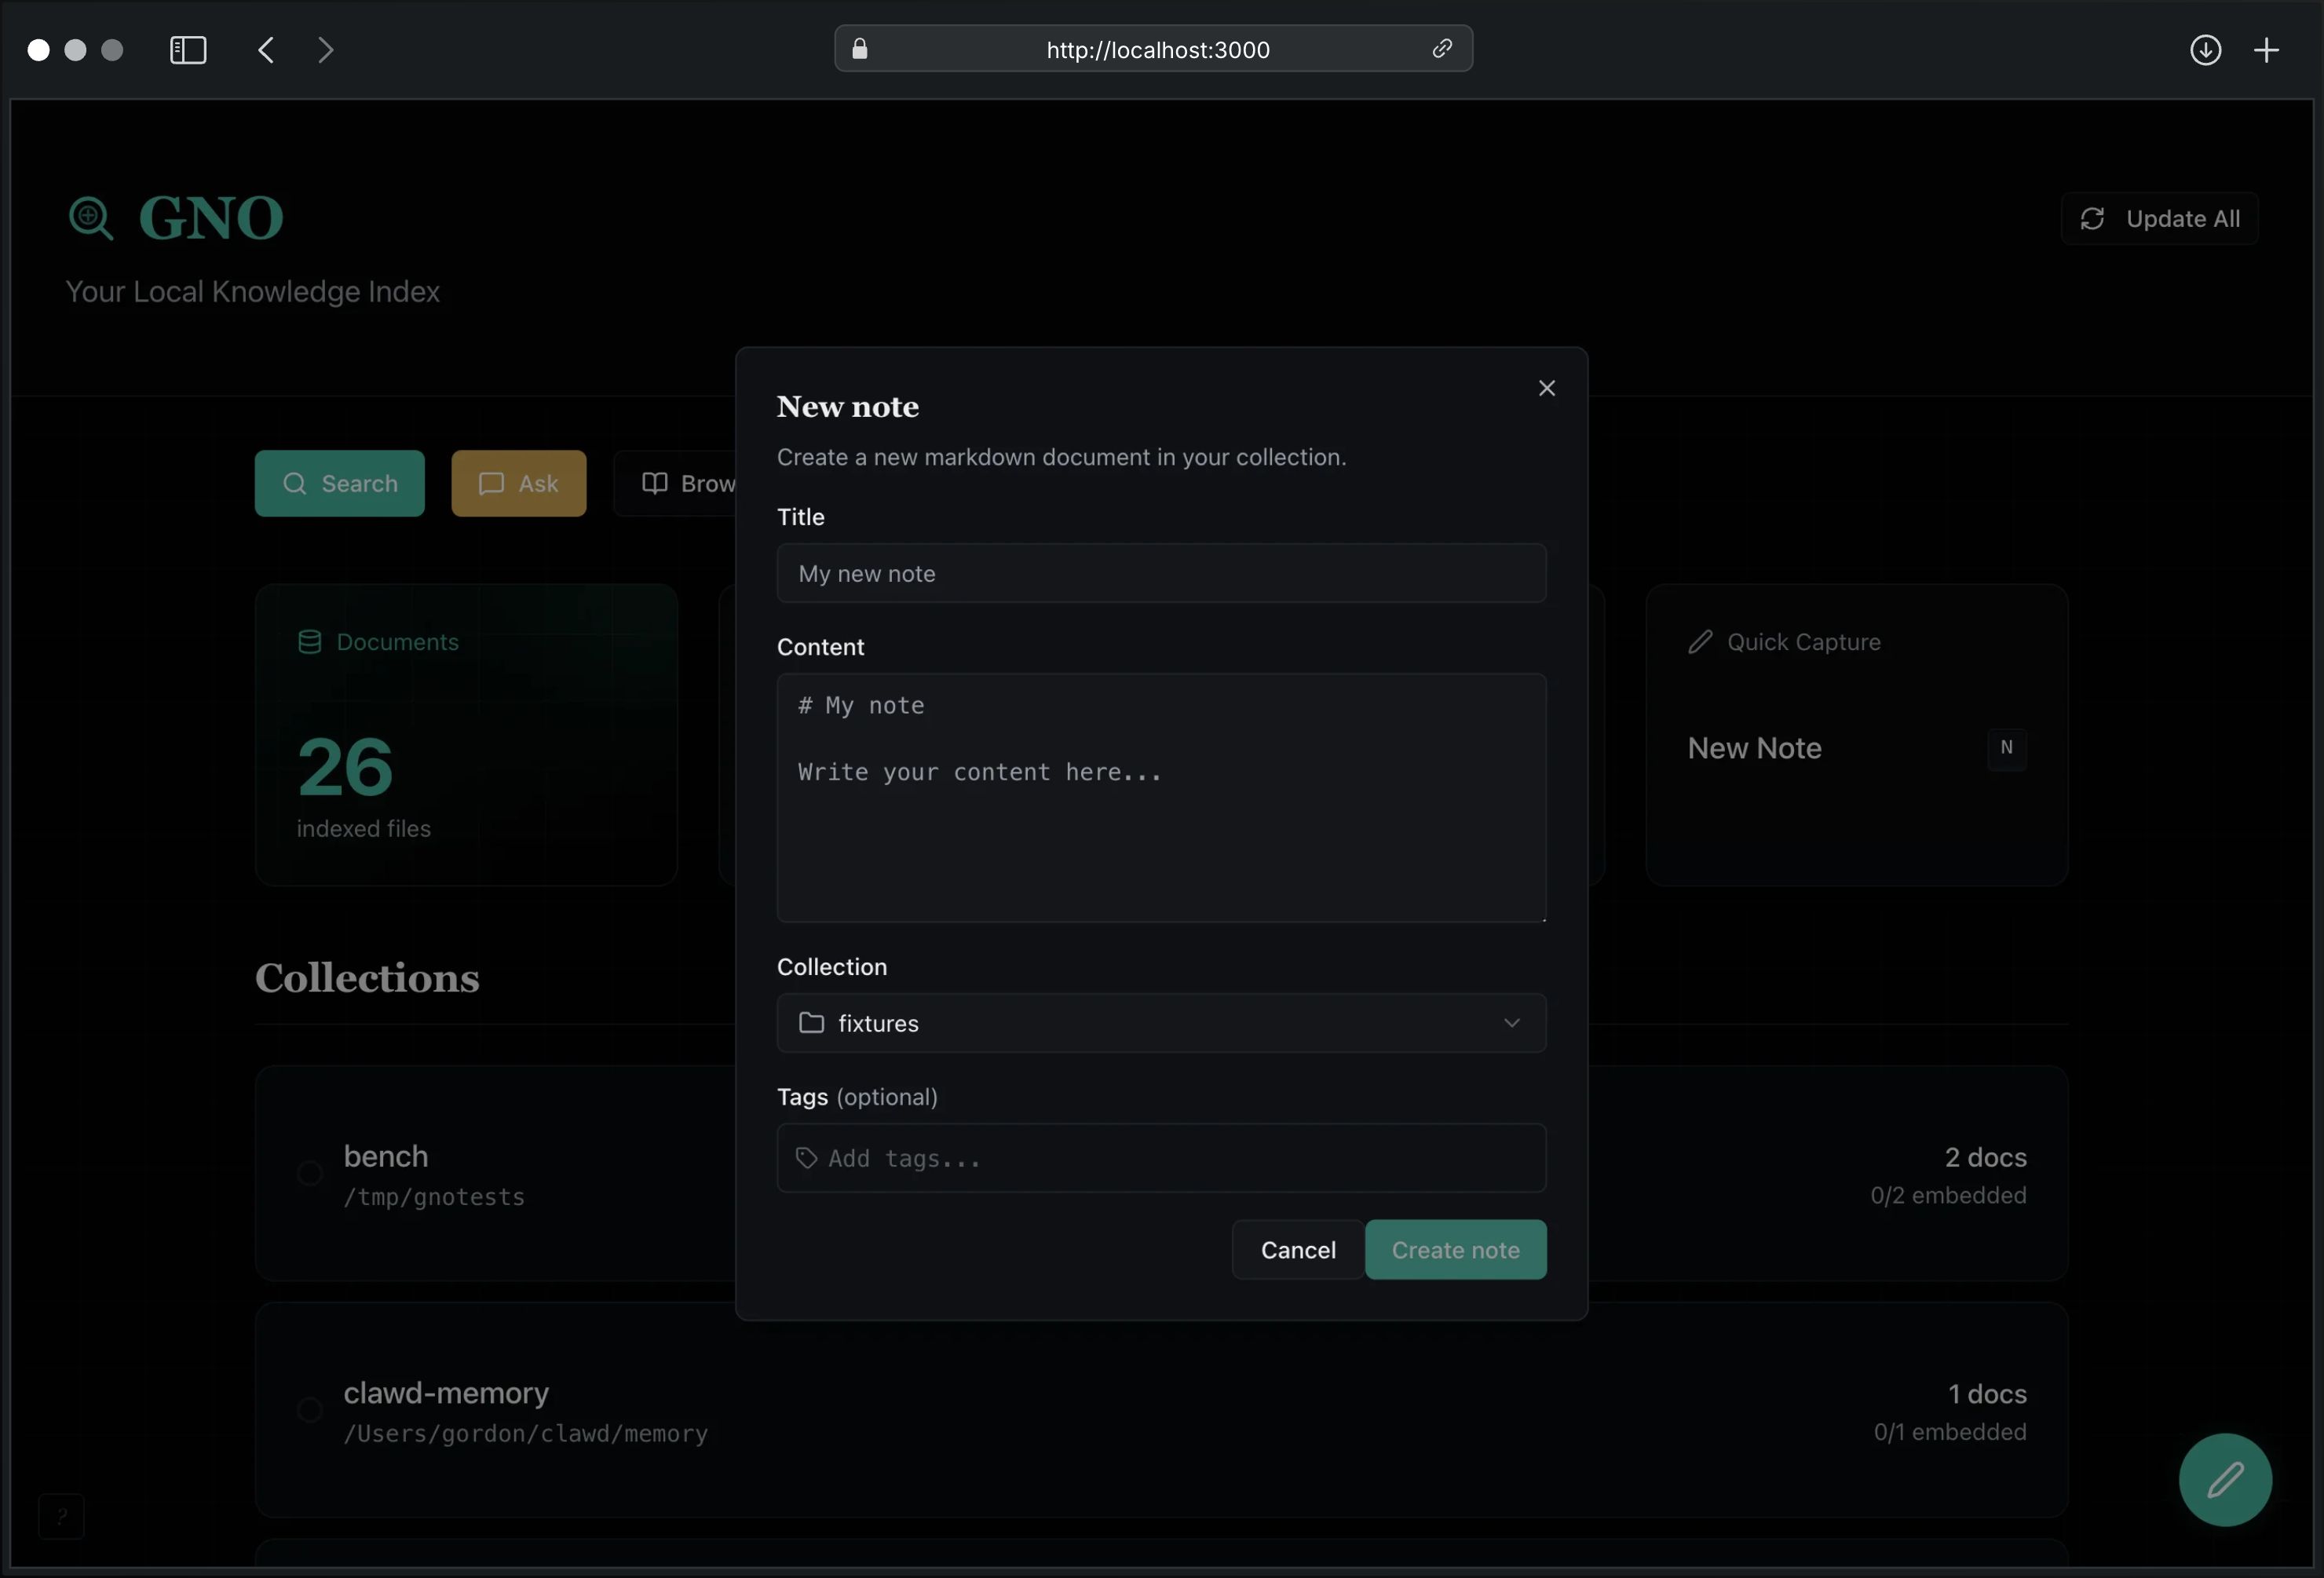
3. Create a Note
Press N (or click the floating + button) to open Quick Capture:
- Enter a title
- Write your content (markdown supported)
- Select a collection
- Add tags (optional, with autocomplete)
- Click Create note
The document is saved to disk and indexed automatically.
4. Search
Click Search or press /. Choose your mode, then open Advanced Retrieval for:
- Collection filter
- Date range (
since/until) - Category + author filters
- Tag match mode (
any/all) - Query modes (
term,intent,hyde)
Choose retrieval mode:
| Mode | Description |
|---|---|
| BM25 | Exact keyword matching |
| Vector | Semantic similarity |
| Hybrid | Best of both (recommended) |
5. Ask Questions
Click Ask for AI-powered answers. Use Advanced Retrieval to scope by collection/date/category/author/tags and add optional intent / candidate-limit / exclude / query-mode controls for ambiguous questions.
Both Search and Ask accept multi-line structured query documents. Press Shift+Enter to add a new line, then use:
auth flow
term: "refresh token"
intent: token rotation
hyde: Refresh tokens rotate on each use.
Note: Models auto-download on first use. The dashboard also exposes model download state and a one-click recovery path if the active preset still needs files. For instant startup, set
GNO_NO_AUTO_DOWNLOAD=1and download explicitly withgno models pull.
Document Editing
Editor Features
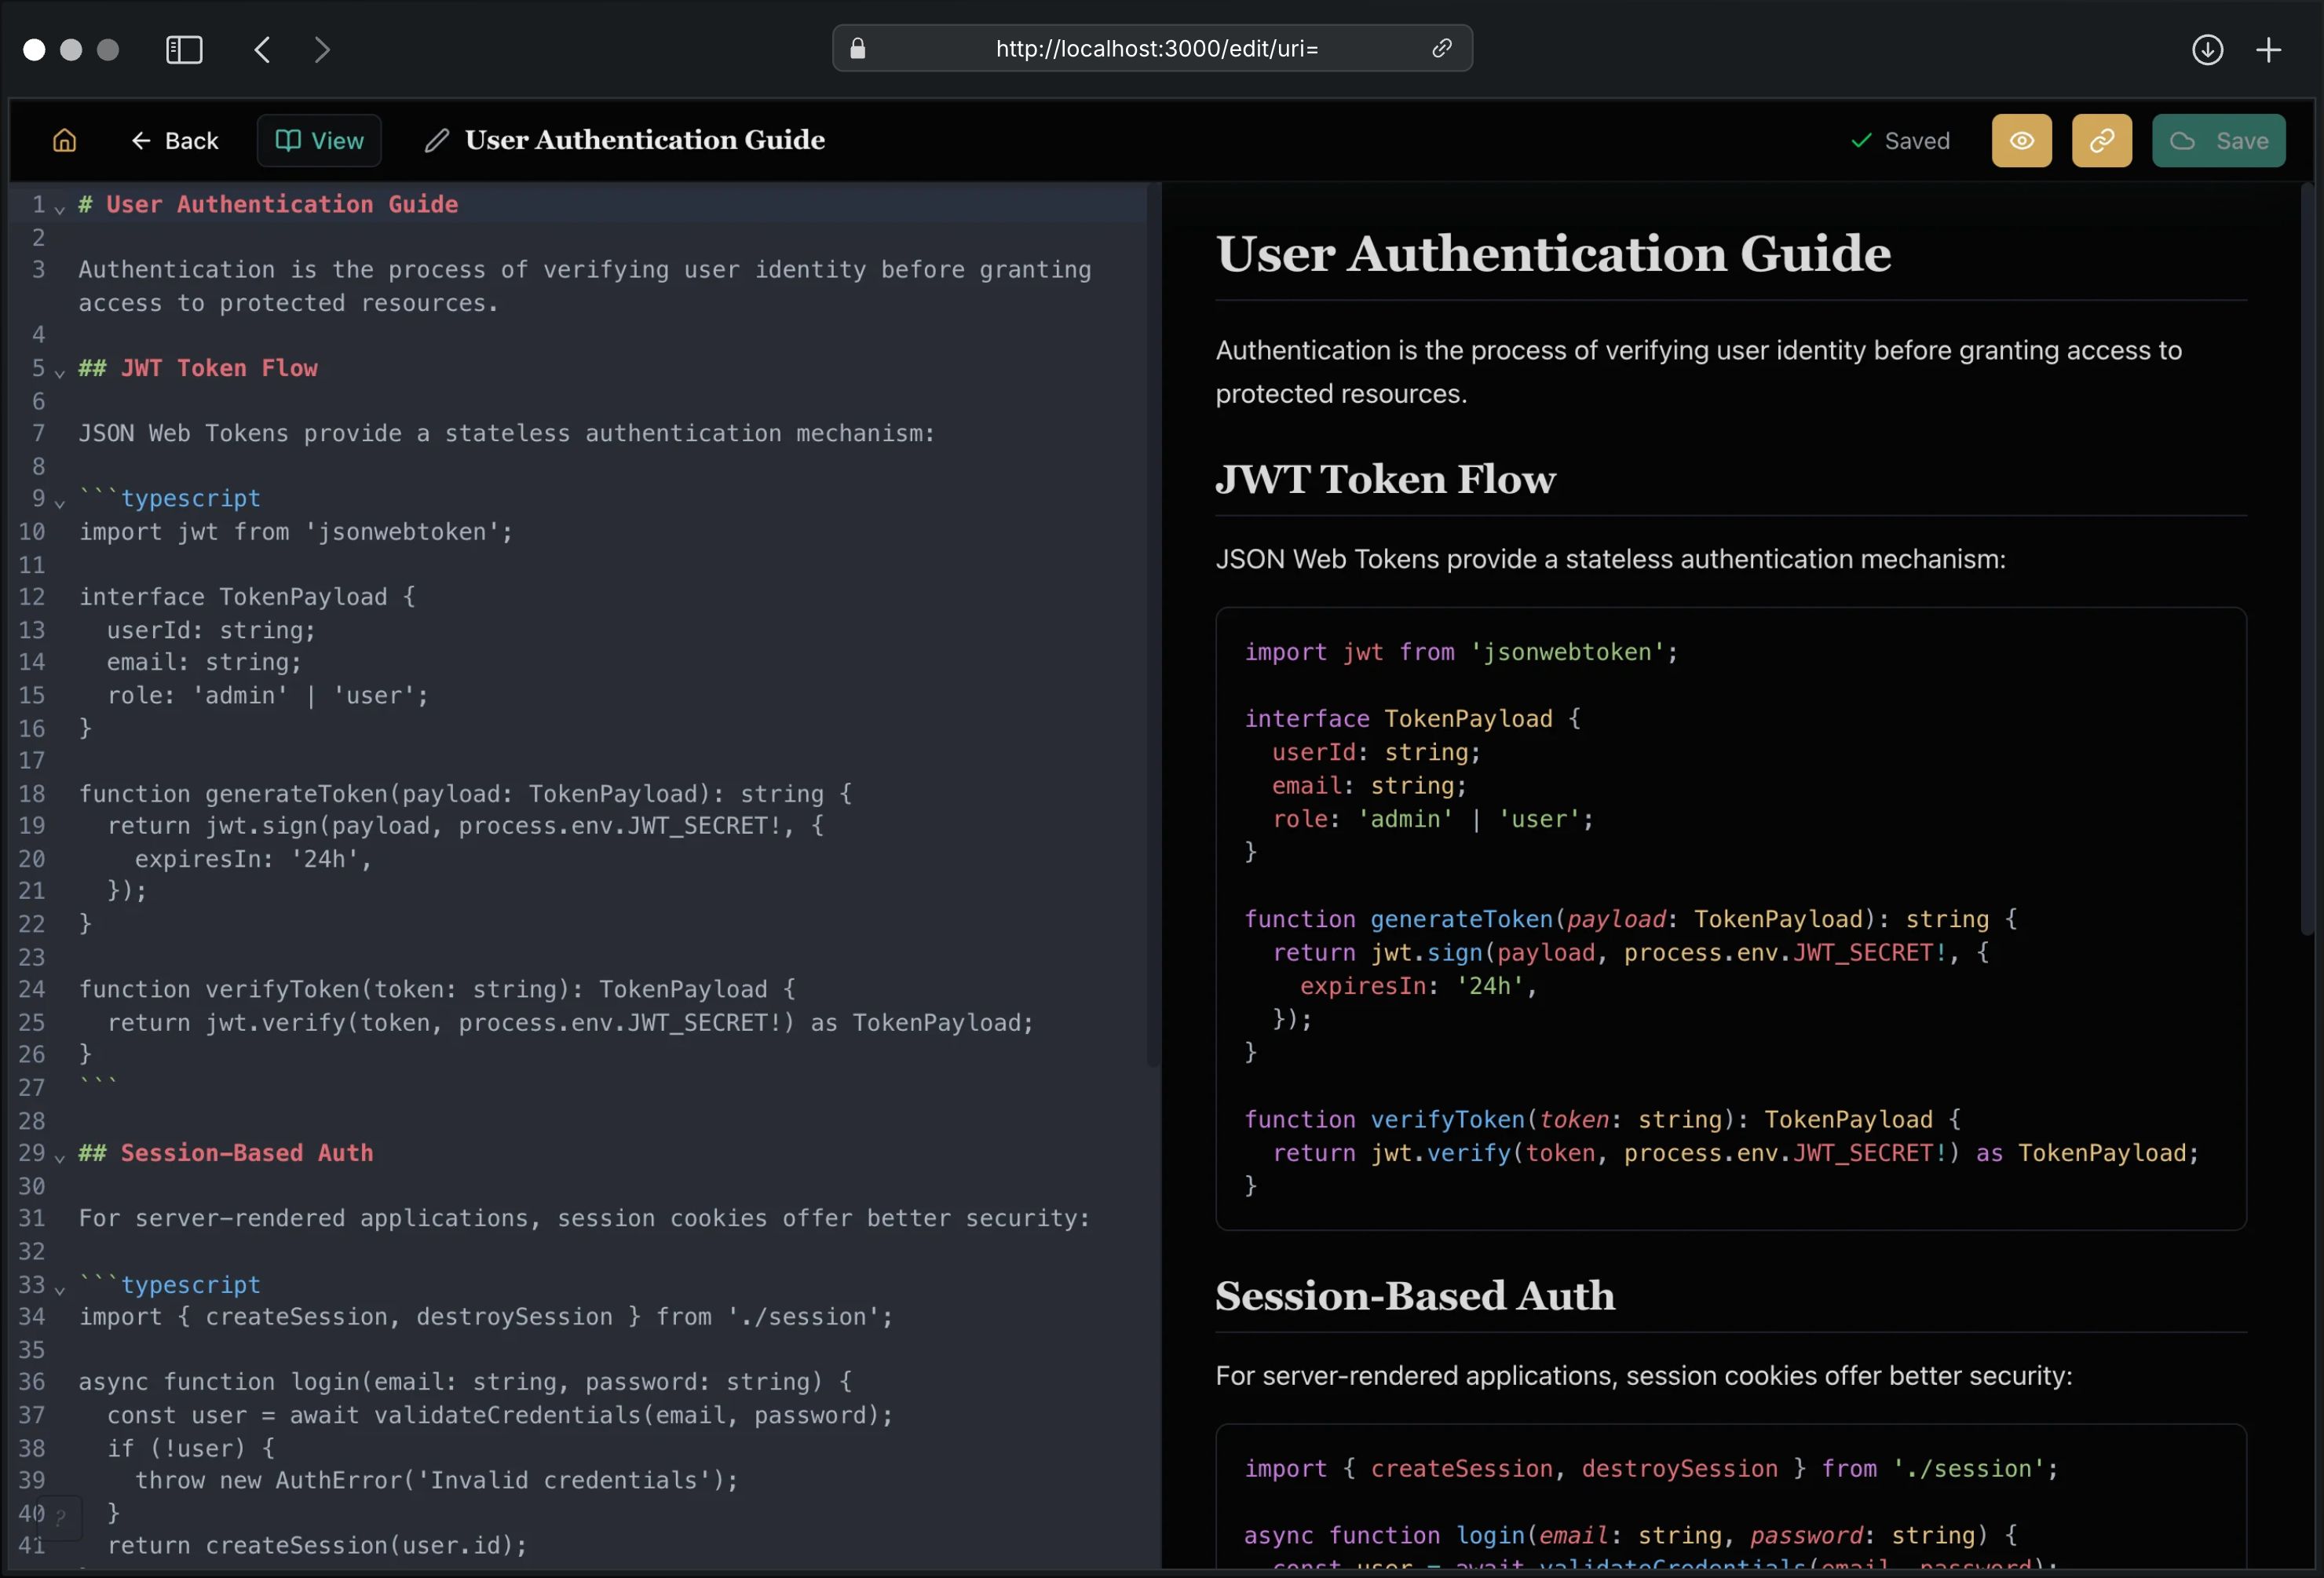
The split-view editor provides:
| Feature | Description |
|---|---|
| CodeMirror 6 | Modern editor with markdown syntax support |
| Live Preview | Side-by-side markdown rendering |
| Local Images | Relative markdown images resolve against the current note |
| Auto-save | 2-second debounced saves |
| Syntax Highlight | Code blocks with Shiki highlighting |
| Unsaved Warning | Confirmation dialog before losing changes |
| Toggle Preview | Show/hide preview pane |
| Safe Editing | Converted source formats stay read-only |
| Wiki Linking | [[...]] autocomplete and linked-note creation |
| Preset Insert | Insert structured note scaffolds from presets |
Keyboard Shortcuts
Press ? to view all shortcuts. Single-key shortcuts (no modifier needed) work anywhere outside text inputs, like GitHub and Gmail.
Global Shortcuts
| Shortcut | Action |
|---|---|
| N | New note |
| Cmd/Ctrl+K | Command palette |
| / | Focus search |
| T | Cycle search depth |
| ? | Show help |
| Esc | Close modal |
Editor Shortcuts
| Shortcut | Action |
|---|---|
| Ctrl+S | Save immediately |
| Ctrl+B | Bold selection |
| Ctrl+I | Italic selection |
| Ctrl+K | Insert link |
| Escape | Close editor |
Opening the Editor
From any document view, click Edit to open the split-view editor. Changes are auto-saved after 2 seconds of inactivity.
Read-only Converted Documents
PDF, DOCX, PPTX, XLSX, and other converted source formats stay read-only in the Web UI. GNO shows their converted markdown/text for browsing and search, but it does not write edits back into the original binary file.
For those documents, use Create editable copy. GNO creates a new markdown note with source provenance frontmatter and opens that copy in the editor.
Creating Documents
Use Quick Capture (N) for new notes:
- Enter a title (generates filename automatically)
- Write content in markdown
- Select target collection and optional preset
- Create directly in the current Browse folder when opened from Browse or the command palette
- Click Create note
The file is written to the collection’s folder and indexed immediately.
Quick Capture now supports:
- place-aware creation from the current Browse collection/folder
- preset-aware note scaffolds
- command-palette create flows without losing current workspace context
Quick Switcher
Press Cmd/Ctrl+K to open the global command palette. It uses the fast BM25 path to:
- jump to recent notes
- jump straight to matching documents
- open exact line-target deep links from search-driven flows
- create a new note with the typed query as the suggested title
- create in the current Browse location when context is available
- jump to core workspace surfaces
- trigger current-note actions like rename, move, and duplicate
- jump directly to named sections in the current note
- create from note presets without opening a separate picker first
Press ? to see both keyboard shortcuts and example command-palette phrases.
Wiki-Link Autocomplete
While editing markdown, type [[ to open note suggestions. GNO fuzzy-matches existing document titles and lets you create a linked markdown note in the current collection when no exact match exists.
Deleting Documents
From document view, the file lifecycle actions now depend on the document type:
- Editable markdown/plaintext files: you can rename them, reveal them in Finder, or move them to Trash
- Converted read-only source files: you can reveal/open the original source, but destructive actions stay index-only unless you handle the file outside GNO
For read-only source material, Remove from index:
- Removes the document from the search index
- Does NOT delete the file from disk
- The document may re-appear on next sync unless excluded
For editable local files, Move to Trash:
- Moves the file to your system Trash
- Removes it from the current index after refresh
- Keeps recovery semantics aligned with normal desktop expectations
File Operations
Editable notes now support richer organization flows:
- Rename in place
- Move to another folder in the same collection
- Duplicate into the current or another folder
- Create folder from Browse
GNO surfaces reference warnings when backlinks or link paths may need review after a refactor.
Collections Management
Collections Page
View and manage your document collections:
- Document count: Files indexed
- Chunk count: Text segments created
- Embedded %: Vector embedding progress
- Model settings: Per-collection override editor with inherited-vs-overridden role display
- Embedding cleanup: Clear stale or all embeddings for one collection
- Re-index: Update collection index
- Remove: Delete collection from config
- Quick picks: Suggested local folders on first run
Adding Collections
On first run, the dashboard and collections page both offer quick-pick folders such as Documents, Desktop, and common Obsidian locations when they exist.
Click Add Collection and provide:
- Path: Folder path (e.g.,
~/Documents/notes) - Name: Optional (defaults to folder name)
- Pattern: Glob pattern (e.g.,
**/*.md)
The collection is added to config and indexed immediately.
Removing Collections
Click the menu (⋮) on any collection card and select Remove. This:
- Removes collection from configuration
- Keeps indexed documents in database
- Documents won’t appear in future syncs
Collection Model Settings
Use the menu (⋮) on any collection card and select Model settings.
The dialog shows:
- the active preset backing the rest of the workspace
- one row per role:
embed,rerank,expand,gen - the effective model URI for each role
- whether the role is inherited from the active preset or overridden on the collection
You can:
- paste a model URI into one role without redefining the rest
- clear one role override and return it to preset inheritance
- keep the global preset unchanged for all other collections
If you change the collection’s embed model on an already-indexed collection, GNO warns that vector search quality will depend on running embeddings for that collection again.
Embedding Cleanup
Use the menu (⋮) on any collection card and select Embedding cleanup.
Choices:
- Clear stale embeddings: removes embeddings for models that are no longer the active embed model for that collection
- Clear all embeddings: removes every embedding for that collection
Notes:
- shared vectors still referenced by other active collections are retained
- after Clear all embeddings, run embeddings again for that collection
Features
Model Presets
Switch between model presets without restarting:
- Click the preset selector in the header or onboarding panel
- Choose: Slim Tuned (current default), Slim (fastest setup), Balanced, or Quality
- GNO reloads models automatically
The preset controls both retrieval expansion and standalone answer generation.
| Preset | Disk | Best For |
|---|---|---|
| Slim Tuned | ~1GB | Current default, tuned retrieval in a compact footprint |
| Slim | ~1GB | Fast, good quality |
| Balanced | ~2GB | Slightly larger model |
| Quality | ~2.5GB | Best answer quality |
Model Download
If models aren’t downloaded, the preset selector shows a warning icon. Download directly from the UI:
- Click the preset selector
- Click Download Models button
- Watch progress bar as models download
- Capabilities auto-enable when complete
The Health Center surfaces the same issue in plain language and points you to the same fix action.
Background Reliability
The dashboard health model now includes background-service state:
- live watcher coverage for each configured folder
- queued or actively syncing watcher work
- background embedding backlog and next scheduled run
- event-stream retry support for long-running tabs after disconnects or server restarts
This is meant to reduce the “why didn’t it refresh?” class of failures in long sessions.
Bootstrap & Storage
The dashboard also shows a Bootstrap & Storage section for first-run explainability:
- current beta runtime strategy (
Buntoday, not yet bundled by the app) - whether local models can auto-download or require manual pull
- current cache path and total disk usage
- per-role model readiness for the active preset (
embed,rerank,expand,answer)
This is the user-facing source of truth for “what will download?”, “where does it live?”, and “why is this preset still incomplete?”.
Recents and Favorites
Navigation is no longer only a hidden keyboard trick.
GNO now keeps:
- Recent documents so you can jump back to what you were just reading
- Favorite documents for high-traffic notes
- Pinned collections for the folders you live in every day
These shortcuts are visible on the dashboard and shared with the quick-switcher, so the same navigation model works with or without the keyboard.
Agent Connectors
The Connectors page gives one place to:
- detect whether core agent integrations are already installed
- install supported Skill or MCP connectors without manually editing config files
- understand the default mode in plain language:
- read/search by default
- write-capable MCP remains an advanced opt-in path
Indexing Progress
When syncing or adding collections, a progress indicator shows:
- Current phase (scanning, parsing, chunking, embedding)
- Files processed
- Elapsed time
Search Modes
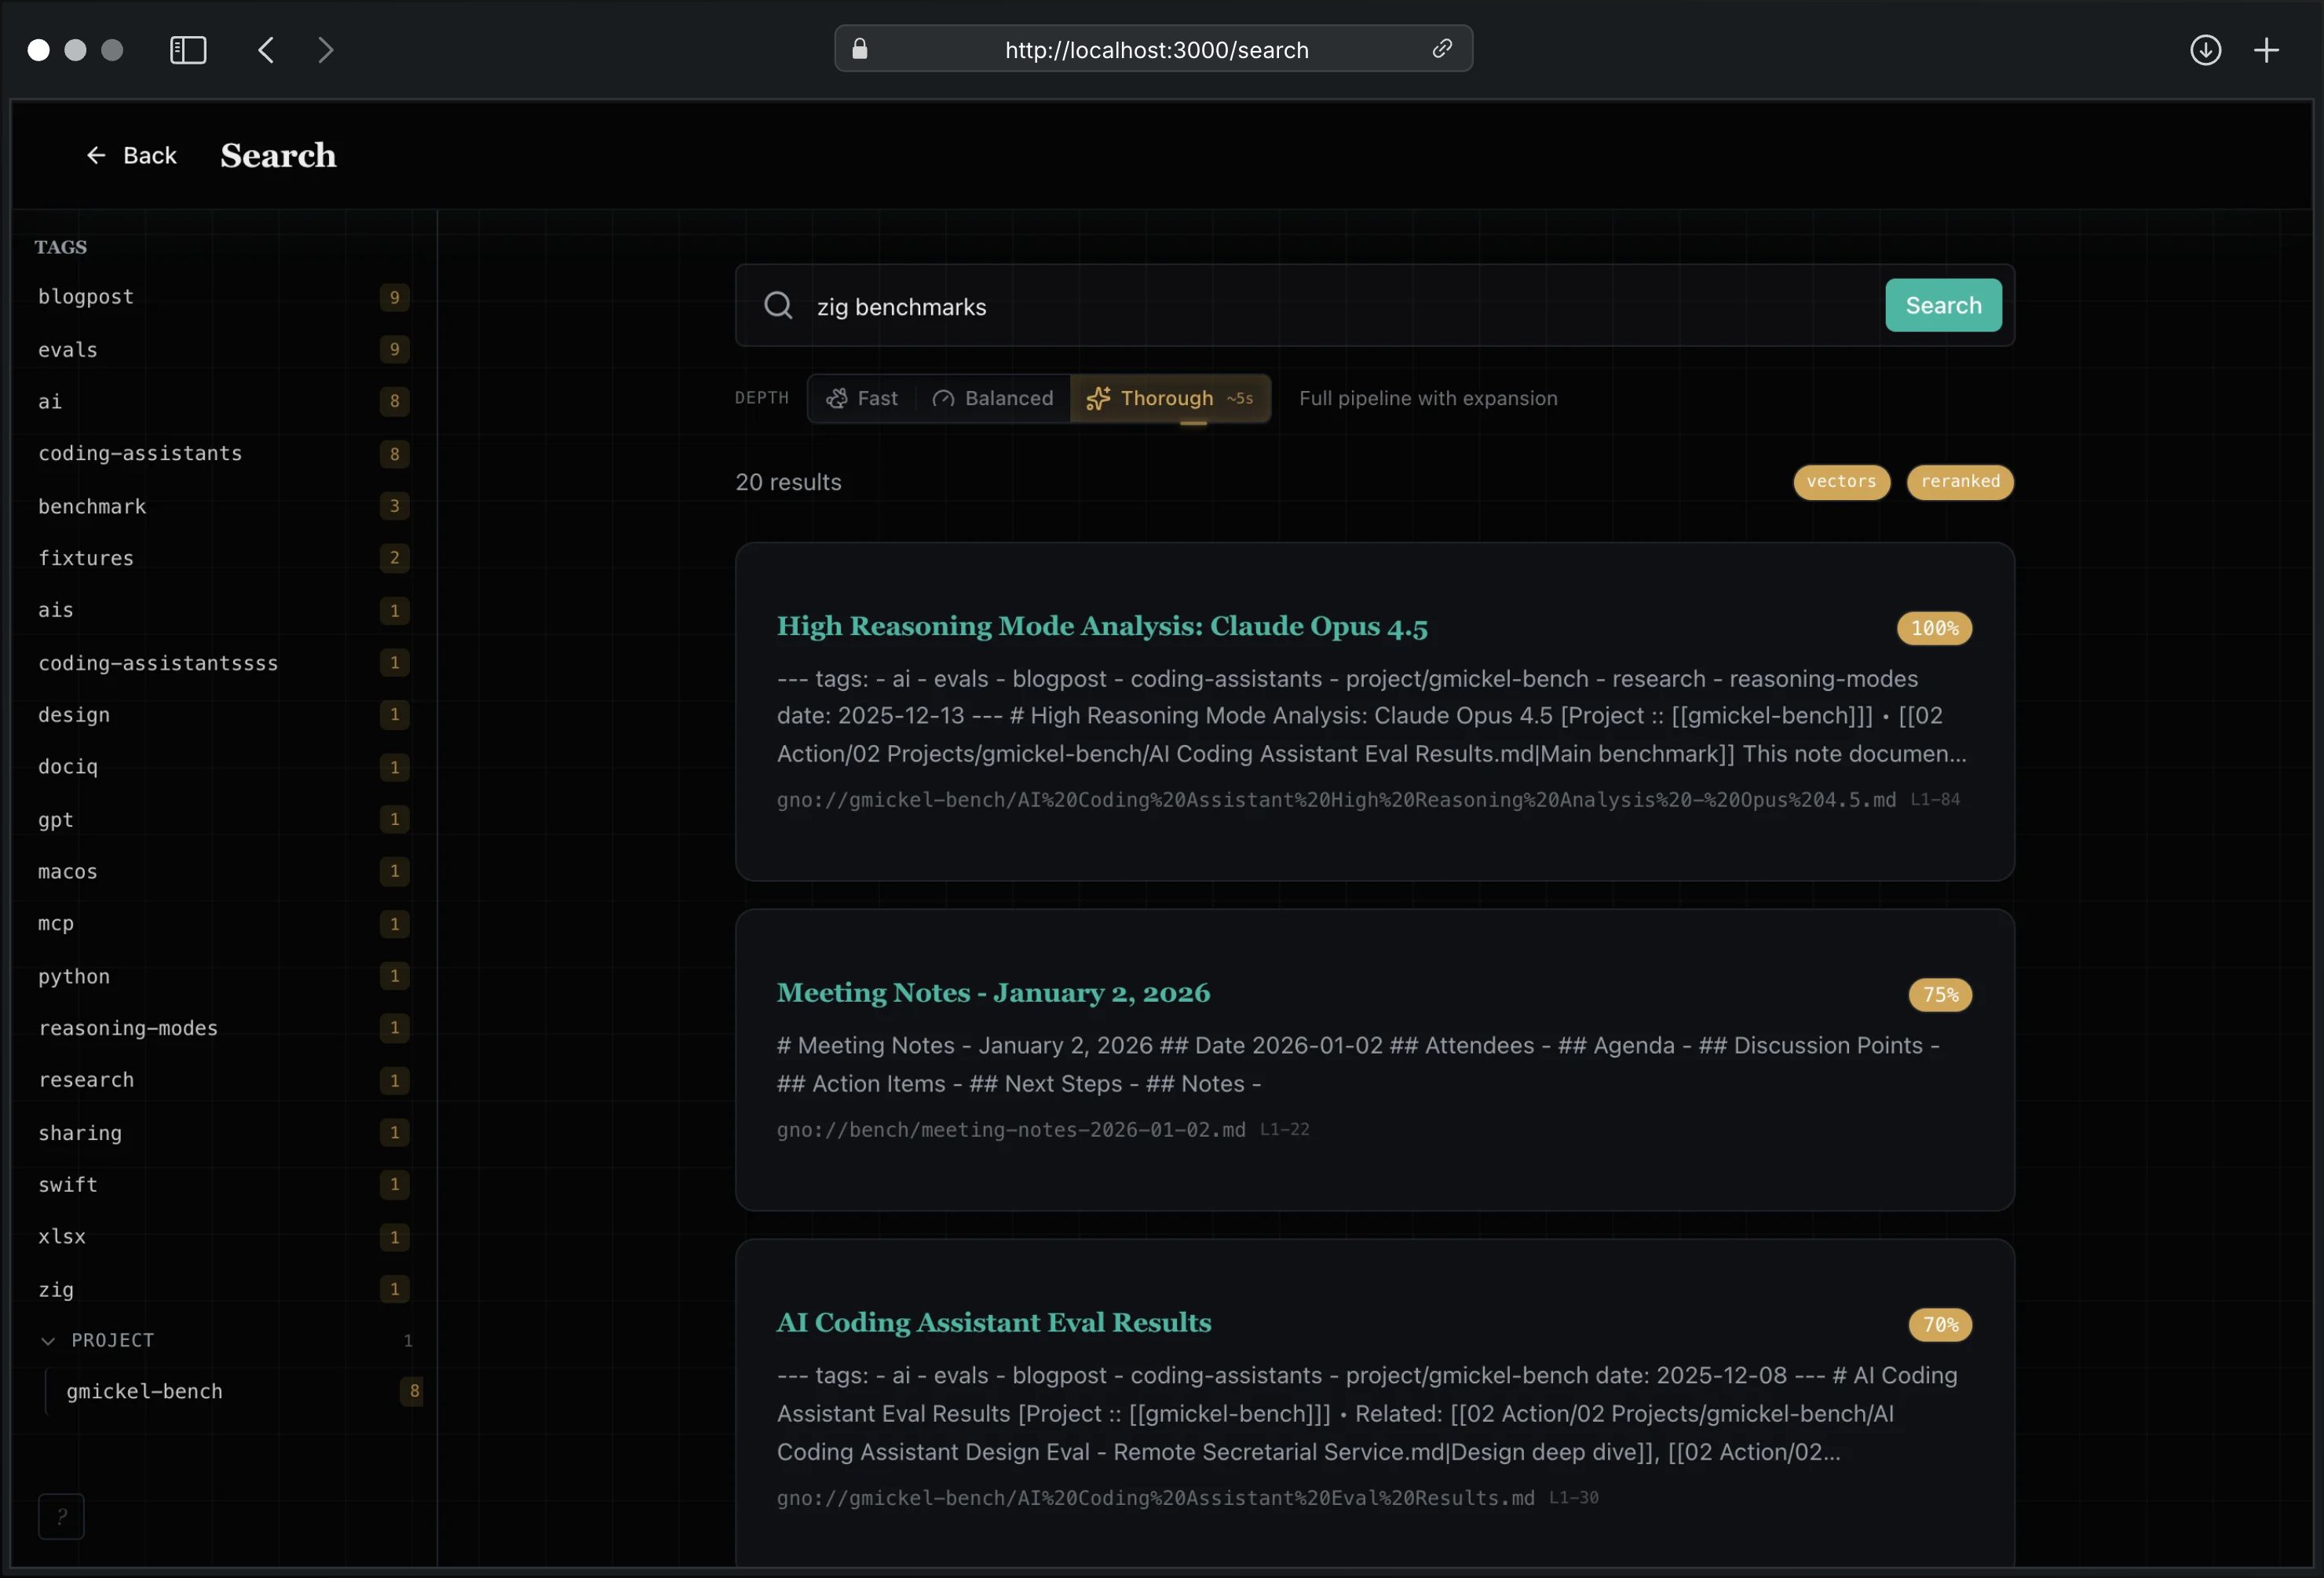
The Search page offers three retrieval modes:
BM25: Traditional keyword search. Best for exact phrases, code identifiers, known terms.
Vector: Semantic similarity search. Best for concepts, natural language questions, finding related content.
Hybrid: Combines BM25 + vector with RRF fusion and optional reranking. Best accuracy for most queries.
Advanced retrieval panel adds structured controls:
- Collection: target one source or search all
- Date range: explicit lower/upper document date filters
- Category/author: frontmatter metadata filters
- Tag mode: switch between tag OR (
any) and tag AND (all) - Query modes: inject
term,intent, orhydeentries for structured hybrid expansion
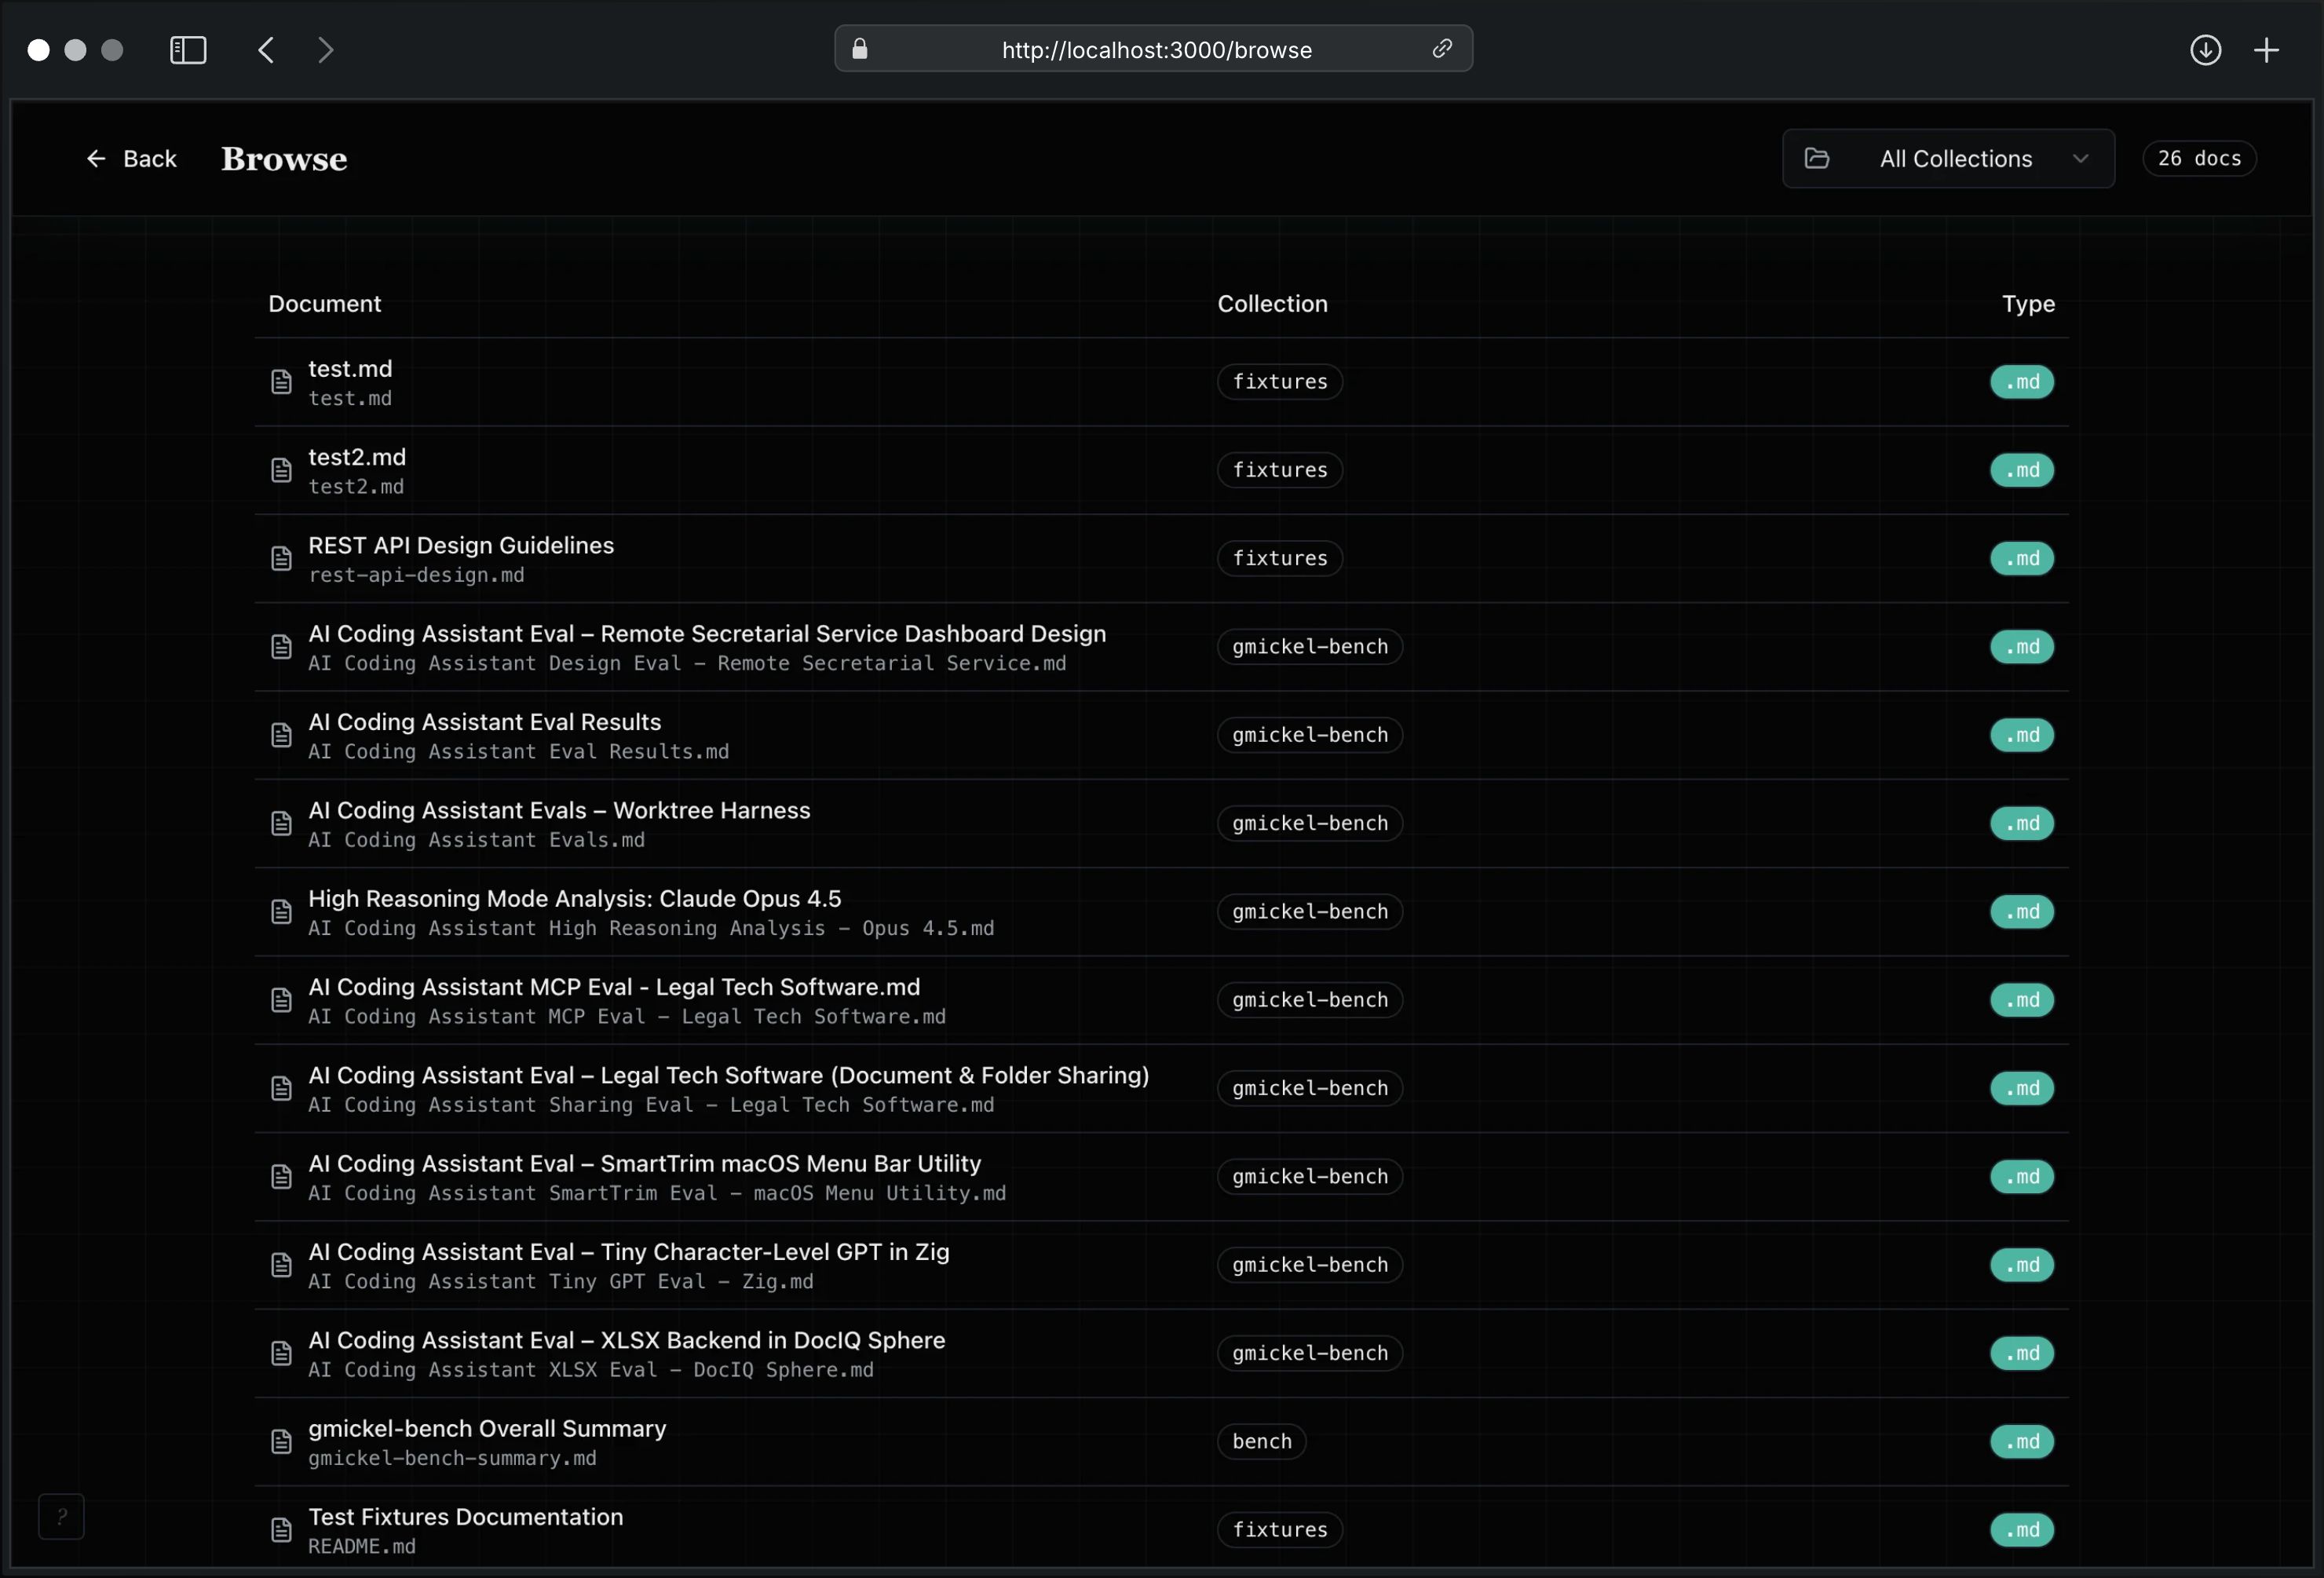
Document Browser
Browse all indexed documents:
- Cross-collection tree sidebar with collection roots and nested folders
- Folder detail pane with subfolders and direct documents for the selected node
- New note and new folder actions from the current Browse context
- Tab-scoped browse state so each workspace tab can keep its own expanded tree context
- Sort by modified time or extracted frontmatter date fields inside the current folder scope
- Paginated direct-document results (25 per page)
- Click any document to view content
- URL query state (
/browse?collection=...&path=...,/doc?uri=...) updates reactively on in-app navigation and browser back/forward - Breadcrumb navigation within collections and folders
- Pin collections and favorite documents from the browser itself
AI Answers

The Ask page provides RAG-powered Q&A:
- Enter your question
- GNO runs hybrid search
- Local LLM synthesizes answer from top results
- Citations link to source documents
Knowledge Graph
The Graph page (/graph) provides an interactive visualization of document relationships:
Features:
- Force-directed graph using react-force-graph-2d
- Nodes represent documents, edges represent links
- Three edge types: wiki links, markdown links, similarity edges
- Collection filter dropdown
- Similarity toggle (when embeddings available)
- Truncation warning when graph exceeds limits
- Click any node to navigate to that document
Navigation:
- Dashboard “Graph” button or
/graphURL - Zoom with scroll wheel
- Pan by dragging background
- Click node to open document view
Filtering:
- Collection: Filter to single collection or view all
- Similarity: Toggle similarity edges (requires embeddings)
- Isolated nodes (no links) are hidden by default
Note: When filtering by collection, node degrees may reflect links to documents outside the current view (used for importance ranking).
Visual Indicators:
- Node size indicates degree (more connections = larger)
- Wiki links shown as solid lines
- Similarity edges shown as dashed lines
- Hover reveals document title
Document Sidebar
The document view includes a collapsible sidebar with link information:
Backlinks Panel: Shows documents that link TO the current document. Useful for seeing what notes reference this one, enabling Zettelkasten-style navigation.
Outgoing Links Panel: Shows links FROM the current document to other documents.
- Wiki links:
[[Note Name]] - Markdown links:
[text](path.md) - Broken links shown with red indicator when target doesn’t exist
Related Notes Panel: Shows semantically similar documents based on vector similarity. Toggle on/off, with similarity scores shown as percentage bars. Great for discovering connections you didn’t know existed.
Document Outline
Long notes now expose a heading-aware outline in the facts rail:
- jump to sections quickly
- copy deep links to section anchors
- keep a live sense of where you are in long notes
Wiki Link Autocomplete
When editing documents, type [[ to trigger wiki link autocomplete:
- Fuzzy matching against all indexed documents
- Cross-collection suggestions with
collection:prefix - Keyboard navigation: ↑/↓ to select, Enter to insert, Escape to cancel
- “Create [[query]]” option to create new notes
- Maximum 8 suggestions shown
Tags
Tags provide hierarchical classification for your documents. Use the Search page sidebar and document views to filter and manage tags.
Tag Format
Tags follow a simple grammar:
- Lowercase letters, numbers, hyphens, dots
- Hierarchical with
/separator (e.g.,project/web,status/in-progress) - Unicode letters supported
Search Page Tag Facets
The Search page includes a sidebar with tag facets:
- Browse tags: View all tags grouped by hierarchy
- Filter by tag: Click a tag to filter search results
- Active filters: Tags shown as chips above results
- Clear filters: Click chip X or “Clear all” to remove
Quick Capture Tags
When creating notes via Quick Capture (N):
- Fill in title and content
- Add tags using the tag input field
- Type to search existing tags (autocomplete)
- Press Enter to add new tags
- Click X on chips to remove
Document View Tags
From any document view:
- See current tags displayed as badges
- Click Edit to modify tags
- Use the tag input with autocomplete
- Click Save to update
Tag changes are saved to the document’s frontmatter (for markdown files).
Configuration
Command Line Options
gno serve [options]
| Flag | Description | Default |
|---|---|---|
-p, --port <num> |
Port to listen on | 3000 |
--index <name> |
Use named index | default |
Environment Variables
| Variable | Description |
|---|---|
NODE_ENV=production |
Disable HMR, stricter CSP |
GNO_VERBOSE=1 |
Enable debug logging |
HF_HUB_OFFLINE=1 |
Offline mode: use cached models only |
GNO_NO_AUTO_DOWNLOAD=1 |
Disable auto-download (allow explicit gno models pull) |
gno serve is not the only live-refresh path anymore. For headless continuous
indexing without the Web UI, use gno daemon.
Security
The Web UI is designed for local use only:
| Protection | Description |
|---|---|
| Loopback only | Binds to 127.0.0.1, not accessible from network |
| CSP headers | Strict Content-Security-Policy on all responses |
| CORS protection | Cross-origin requests blocked |
| No external resources | No CDN fonts, scripts, or tracking |
| Path traversal guard | Write operations validate paths stay within root |
Warning: Do not expose
gno serveto the internet. It has no authentication.
Pro tip: Want remote access? Use a tunnel:
- Tailscale Serve: Expose to your Tailnet
- Cloudflare Tunnel: Free tier with auth
- ngrok: Quick setup, supports basic auth
Architecture
Browser
   │
   ▼
┌─────────────────────────────────────┐
│  Bun.serve() on 127.0.0.1:3000     │
│  ├── React SPA                      │
│  │   ├── Dashboard (/, stats)       │
│  │   ├── Search (/search)           │
│  │   ├── Browse (/browse)           │
│  │   ├── DocView (/doc)             │
│  │   ├── Editor (/edit)             │
│  │   ├── Collections (/collections) │
│  │   ├── Ask (/ask)                 │
│  │   └── Graph (/graph)             │
│  └── REST API (/api/*)              │
├─────────────────────────────────────┤
│  ServerContext                      │
│  ├── SqliteAdapter (FTS5)          │
│  ├── EmbeddingPort (vectors)       │
│  ├── GenerationPort (answers)      │
│  └── RerankPort (reranking)        │
└─────────────────────────────────────┘
Testing
The Web UI now has three test layers:
# Existing Bun suite, including DOM interaction tests
bun run test:web

# One-time Chromium install for browser smoke
bun run test:e2e:install

# Repo-local browser smoke path
bun run test:e2e
Notes:
- DOM interaction tests stay Bun-first:
bun:test+@testing-library/react@testing-library/user-event.
- The DOM shim uses
happy-dom, notjsdom, because Bun recommends thehappy-dompreload path for browser-like tests. - Shared setup lives in
test/preload/happy-dom.ts. - Shared render helpers live in
test/helpers/dom.tsx. - For module mocks like
apiFetch, applymock.module()before dynamic imports so the mocked dependency is active when the page/component module loads. - Browser smoke uses Playwright against a temp config/index and a real
gno serveprocess.
Troubleshooting
“Port already in use”
gno serve --port 3001
# Or find and kill the process:
lsof -i :3000
kill -9 <PID>
“No results” in search
gno status
gno ls
# If empty, run:
gno index
AI answers not working
gno models list
gno models pull
Editor not loading content
Refresh the page. If content still doesn’t appear, check browser console for errors.
Changes not saving
- Check browser console for API errors
- Verify collection folder has write permissions
- Check disk space
API Access
The Web UI is powered by a REST API. See API Reference for details.
# Create document
curl -X POST http://localhost:3000/api/docs \
  -H "Content-Type: application/json" \
  -d '{"collection": "notes", "relPath": "new-note.md", "content": "# Hello"}'

# Update document
curl -X PUT http://localhost:3000/api/docs/abc123 \
  -H "Content-Type: application/json" \
  -d '{"content": "# Updated content"}'

# Get outgoing links
curl http://localhost:3000/api/doc/abc123/links

# Get backlinks (who links to this doc)
curl http://localhost:3000/api/doc/abc123/backlinks

# Get similar documents
curl "http://localhost:3000/api/doc/abc123/similar?limit=5&threshold=0.5"